Autodesk Fusion 360 Easy Way to Generate Threads for Lids
Fusion 360 has a thread feature that lets users easily recreate realistic and working threads for their projects. These threads can be 3D Printed, milled, or used in 2D manufacturing drawings.
Thread Types in Fusion 360

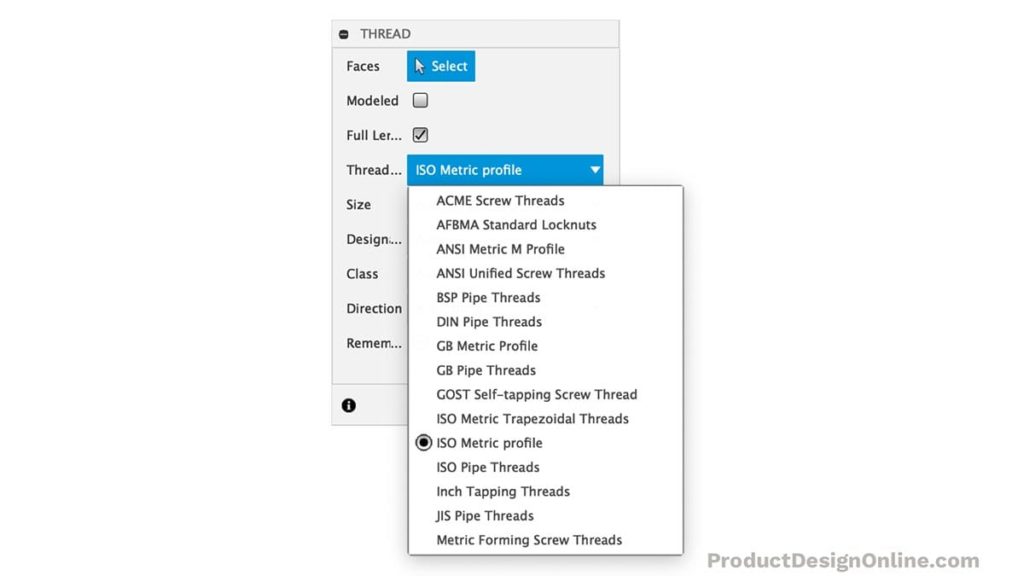
Fusion 360's Thread feature offers several preset thread types. All of the thread types are based on industry and global standards that are produced for different product needs.
- ACME Screw Threads – most commonly used as lead screws because of their trapezoidal thread shape
- AFBMA Standard Locknuts
- ANSI Metric M Profile
- ANSI Unified Screw Threads
- BSP Pipe Threads – standard thread type that has been adopted internationally, and used all throughout Europe, for interconnecting and sealing pipe ends.
- DIN Pipe Threads
- GB Metric Profile
- GB Pipe Threads
- GOST Self-tapping Screw Thread
- ISO Metric Trapezoidal Threads
- ISO Metric Profile – one of the most common thread types worldwide. Typically used for general-purpose screws.
- Inch Tapping Threads
- JIS Pipe Threads
- Metric Forming Screw Threads
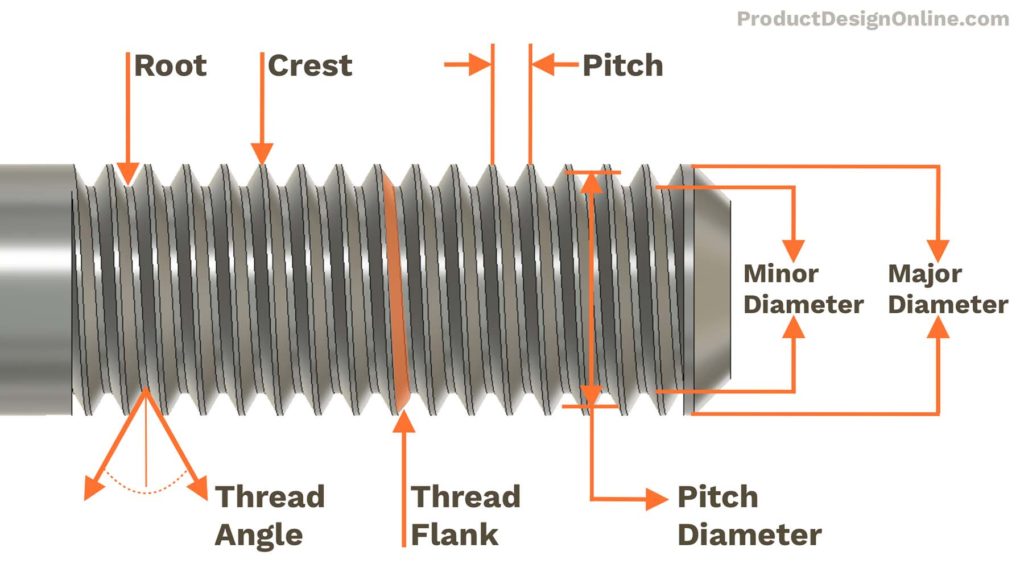
Thread Terminology

- Root – the inner-most part of the thread
- Crest – the outer-most part of the thread
- Pitch – the distance from the crest of one thread to the next (typically measured in mm)
- Thread Angle – the angle between the flank of a screw thread and the perpendicular to the axis of the screw
- Thread Flank – the straight sides that connect the crest and the root
- Pitch Diameter – the distance of two opposite flanks or the distance of the centerline of the profile
- Minor Diameter – the diameter determined by the groove of the thread
- Major Diameter – the diameter determined by the thread tips
Designation and Classes
The designation for a metric thread includes information on the thread diameter, pitch, and thread tolerance class.
For example, a thread designated as m12x1 – 5g6g indicated the thread has a nominal diameter of 12mm and a pitch of 1mm. The 5g indicated the tolerance class for the pitch diameter. The 6g is the tolerance class for the major diameter.
In Fusion 360, the class represents the tolerance class, or how much variance is allowed. A tolerance class is made up of two parts, a tolerance grade, and a tolerance position.
Tolerance grades are represented by numbers. The lower the number the smaller the tolerance.
Each preset thread type (in Fusion 360) may have different classes to choose from.
Creating Clearance in Fusion 360
Fusion 360 will automatically add a very small clearance of .1mm to internal/external threads. This is great if you have a precisely machined product. However, this clearance is typically not enough with 3D printed threads.
To create additional clearance you can use the Offset Face command.
- Select the top or bottom Flank of the thread
- Hit the keyboard shortcut letter "Q" to activate the Offset Face command
- Type out the new clearance value. Typically between -.15 and -.2 work well for 3D prints. (Remember this is only half the clearance as next you'll repeat the steps to the opposite flank)
- Repeat steps 1-3 on the opposite flank
- Repeat the steps to the mated part. For example, if you added more clearance to a bolt, you'll want to now add that to the nut.
Clearance vs Tolerance
The words "Clearance" and "Tolerance" are often used interchangeably. Unfortunately, they shouldn't be used in this manner.
Clearance refers to the distance between the adjacent surfaces of mating parts. In other words, how much (distance) the parts clear each other.
Tolerance refers to the allowable variation of a dimension from the desired value. In other words, the amount of error that you will tolerate.
For example, the clearance of a nut and bolt is the space between the (threads of the) two parts. The tolerance represents the size variances allowed when the nut and bolt are manufactured.
If you 3D Print threads, your 3D printer's tolerance will influence how much clearance is required between the internal and external threads.
Cosmetic vs Modeled
By default, Fusion 360 threads are solely cosmetic. They are simply a decal that wraps around a cylinder. This is because most CAD assemblies only need the thread types documented in the 2D drawing.
Having cosmetic (decal only) threads also improves Fusion 360 performance when you're using hundreds of screws or parts with threads.
If you're wanting to 3D print the threads then you'll need to check the "Modeled" checkbox at the top of the Thread dialog.
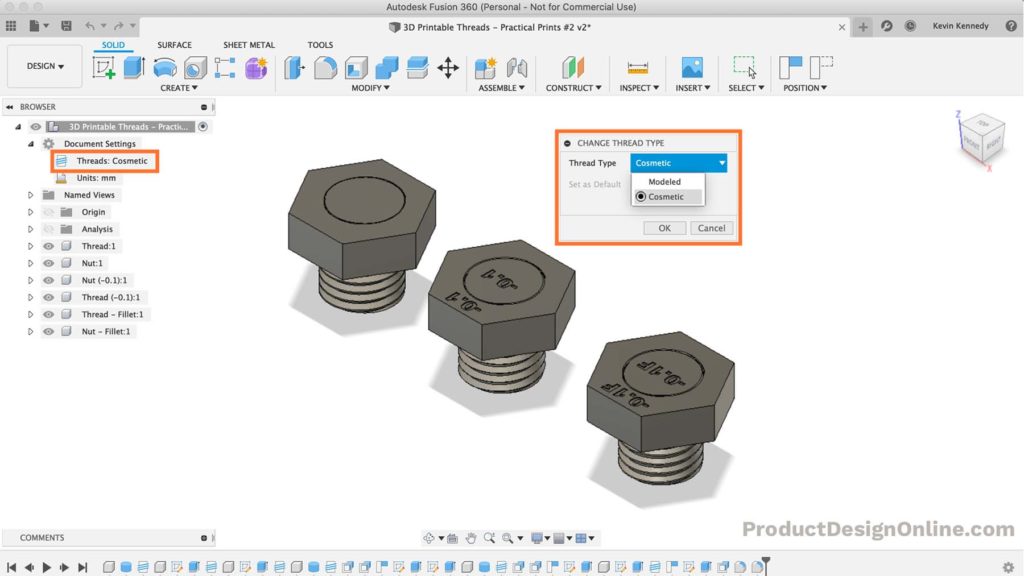
Pro Tip: You can switch back and forth between modeled and cosmetic threads from the Fusion 360 Browser. This will change all of your threads at once. It's a great way to switch to cosmetic while you work on other parts of your model.
- Toggle open the document settings
- Hover over the thread icon (Threads: Cosmetic) > select Change Thread Type
- In the Change Thread Type dialog, Switch thread type to Cosmetic > OK
Note: this will not work to threads that have been altered.

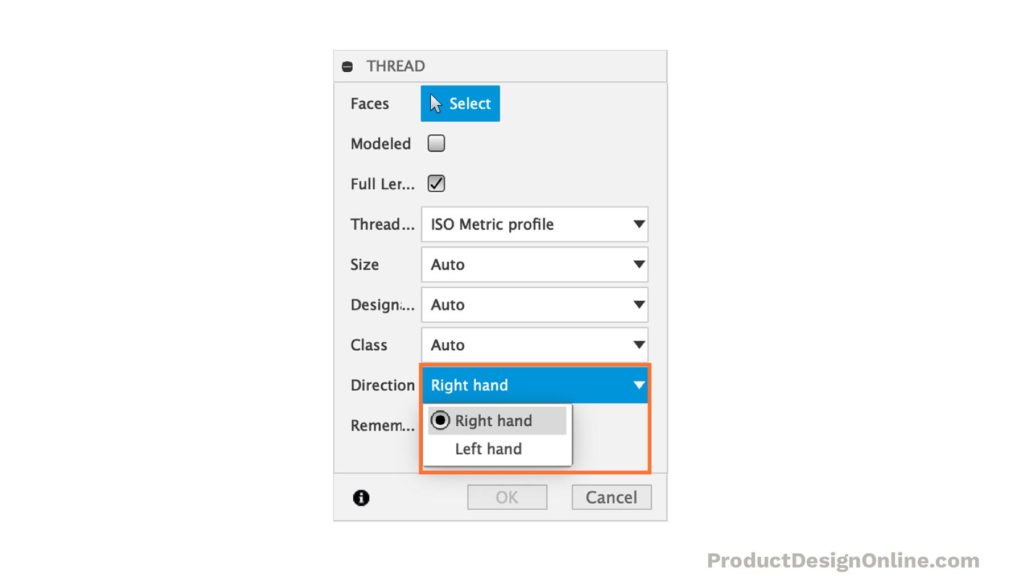
Right Hand vs Left Hand Thread Direction

The direction of a threads helix will determine whether it is right hand or left hand. A right hand thread is one which is turned clockwise, while a left hand thread is one that advances when turned counter-clockwise.
The majority of screws are right hand screws. If a screw does not have an abbreviation LH, for left hand, then it should be considered a right hand one.
Left hand (reverse) threads are only used when the rotation of the object would gradually loosen with the applied torque. Some common examples include bicycle (left) pedals, turnbuckles, gas line parts, or parts of specific machinery.
Tap and Die Set
Taps and dies are tools used to create screw threads, which is known as threading. They can be used with some materials they can create new threads. Other materials can be rethreaded (fixed) with the use of a tap and die.
A die is used to cut the male portion of the mating pair, such as a bolt. A tap is used to cut the female portion of the mating pair, such as a nut.
Tap and Die sets can be used to refine 3D printed threads. They are particularly useful for small 3D printed threads. Your 3D Printer's tolerances can be "cleaned up" by running the tap or die through the thread, which takes away the variations in the plastic.
I recommend this great starter set for 3D Printed thread projects. The "ABN Metric and SAE Standard Tap and Die 60-Piece Rethread Set" is affordable and comes with a nice hardshell case to keep the set organized and protected.

Check Price on Amazon
Watch the Tutorial
Transcript
Hey there, it's Kevin Kennedy and welcome to episode number 2 of Practical Prints, a new 3D printing series where I demo designing for 3D printing in Fusion 360.
By the end of this video, you'll know how to create 3D printable threads. We'll look at creating external and internal threads, creating clearance for threads and nuts, and a trick to make plastic threads last longer.
We're going to create three different test threads so that you can print them out to see which clearance works best for your printer. Be sure to stick around until the very end where I'll demo the final 3D prints.
To create the first thread, we'll need to create a new component. This will ensure we can create copies of the design so we can test the different clearances.
Once our Thread component is active, we can use the cylinder command. You can also create a sketch with a circle and extrude it, to achieve the same thing. However, I prefer the cylinder command as it results in one feature in the timeline where you can change both the diameter and the height in the same place.
For these test prints, I want to make an m16 Hex bolt. Therefore, I'm going to make this 16mm in diameter. For the length, you would set this to the size required for your project. However, because we're going to create some test prints, we'll set this to only 20mm, so we have just enough threads to test them.
To create the threads all we need to do is activate the thread command from the "Create" dropdown or the shortcuts box.
Select the face of the cylinder as the location of the threads. You'll then see that Fusion 360 will automatically detect the size of your cylinder and it will utilize the closest thread type. Ours defaulted to the m16 because 16mm was the size of our cylinder.
The most important step when creating 3D printable threads is that you will need to check the "modeled option". They recently moved this to the top as a lot of people looked over the option while it was placed at the bottom.
In its current state, the thread is just a decal or image representing the threads. This is because in most CAD assemblies you'll just need to note the threads in a 2D drawing for manufacturing. The decals will keep your Fusion 360 file running much faster, especially in large assemblies with hundreds of screws.
Watch what happens as I check the "Modeled" option. You'll see the model went from being a cylinder with a decal wrapped around it to 3-dimensional threads that we can now 3D print.
After checking the "Modeled" option we are also given the "Full Length" option. By default, this will be checked. However, if you don't want the threads to run the entire length of your selected face, then you can simply deselect this option.
You can then drag the blue directional arrow, or you can type out an exact distance in the Thread dialog.
With the "Full Length" option unchecked we are also presented with another option. The ability to offset allows you to change the start location by setting an offset distance. For now, we'll leave this set to zero so we can screw on the nut from either end.
I'm also going to leave it set to "Full Length".
For the thread type, this defaults to the ISO Metric Profile. Again, based on the size of our cylinder, Fusion 360 assumed we wanted to create an m16. In this case that was correct, however, you can also choose from several preset thread types based on the type of project you're working on. I'll have more info on each of these thread types on this tutorial's resource page at ProductDesignOnline.com/p2… that's ProductDeisignOnline.com/p as in printer and the number 2.
The size option lets you change the size of the thread. If I switch this to 20mm, you'll see that the designation switches to m20.
For now, I'll switch the size back to 16mm.
With the designation option, you can define the pitch of the thread. The pitch of a thread is the distance from one crest to the next crest.
Right now the pitch is currently set to 2mm because the designation is m16x2.
Watch what happens to the pitch of the threads in the model as I change this to a lower pitch. You'll see the threads are much closer together.
If you're going to 3D Print a thread the pitch is one area that takes some trial and error. A lot of pitches that can be used for metal threads simply will not print well, due to their close proximity not working with the tolerances of a 3D Printer.
I've found this size of thread is a great starting point if you're going to 3D print threads for the first time. Generally, anything smaller than an m12 or m14 is going to require a lot more trial and error to figure out the right clearances based on your 3D printers' tolerance.
This 2mm pitch works better than the smaller pitches because the thread angle and thread flank are larger, making it easier to achieve a more precise print.
The next option in the "Thread" dialog is the various class options. The class represents the thread's tolerance class. In short, thread classes represent the tolerances allowed with the pitch diameter and the major diameter of a thread. I'll have more on this topic on my website.
The second to last option is the thread direction. The majority of the time you'll want to leave this on the default of right-hand. However, if you do find yourself working on a project where something loosens anti-clockwise, you'll want to use left-hand, which will prevent loosening over time.
Lastly, is the ability to check the "remembered size" which will remember all of these thread settings for the next thread feature you create. Because I'm going to copy this first component, I'm not going to worry about checking this option. Instead, I'll click OK to create the thread.
Let's now make a second component to create a nut for this first thread.
We'll then need to create a new sketch off either the top or bottom of the thread so that we can sketch a polygon for the nut.
I'm going to use the circumscribed polygon to create the hex nut. From the center origin, I'll type out a radius of 12mm. You can also clear out the command with the escape key, select the horizontal constraint in the toolbar, and select an edge. This will make sure the sketch is fully-constrained.
We'll also need to create a 16mm center-circle for the internal thread.
For the height of the nut, I'm going to extrude this to 8mm.
The next step would be for us to apply the internal thread to the nut. To do this we can activate the thread feature and simply select the inside cylinder.
Once again, Fusion 360 will automatically detect the closest thread type.
After confirming it detected the m16 thread that we're going for, we can click the "OK" button.
At this point, we can take a look at the section analysis to see how much clearance there is between the two parts.
From the inspect dropdown, select the section analysis. Then, simply click one of the vertical origin planes.
If I zoom in, you'll see that Fusion 360 automatically includes a clearance between exterior and interior threads.
This first thread and nut, is going to be our first clearance test. By default, it has a .1mm clearance. Depending on the size of the thread and the tolerance of your 3D printer, this default clearance typical needs modifications…but we'll use it as the start of our test.
Let's make a copy so I can show you how to increase the clearance, which is typically needed before 3D Printing on a consumer-level printer.
I'm going to shift-click the two components in the Browser. I'll right-click and select "copy". Then, I'll right-click on the top-level assembly, which will let us choose the "Paste New" option.
It's important that you select "Paste New" and not "Paste" as you want this to create an unlinked copy so our first two components aren't altered.
I'm going to drag the copies to the right and I'll click OK.
Before we add additional clearance, I'd love to hear what types of 3D printing projects with Fusion 360 workflows you find the most challenging. Many of you have already commented with great ideas…but the more people that comment the easier it will be for me to create content with the highest demand. Help me out by commenting down below with at least one 3D printing workflow that you struggle with.
Unfortunately, at this time Fusion 360 does not have a clearance option built into the thread command. Instead, what you have to do is offset the thread faces based on your printer tolerances.
I'm going to hide the copied Nut and I'll activate the copied Thread.
We'll select the top thread flank and then we'll hit the keyboard shortcut letter "Q", as in Quebec. Remember this shortcut activates either the press pull command or the offset faces command, based on our selection.
We want to offset the face a negative distance to add a slightly larger clearance between this external thread and the internal thread of the nut.
I want a total of -0.2, so I'll offset this thread another -0.1.
We'll then need to do the same thing for the bottom. I'll select the bottom thread flank > hit the keyboard letter "Q" and I'll type out -0.1.
If you turn the copied nut component back on, you'll see that we now have a larger clearance between the two parts. This method can be used with trial and error to find the perfect clearance for your desired thread size.
There are so many factors in play between 3D printers being different, setting up the file in slicing software, and so on. Just keep in mind that as threads get smaller they'll lose some of the finer details, and their clearance may need to be tweaked even more.
Another thing I would highly recommend when you create test prints is to label them before you print them out. This is a great way to keep track of what works and what doesn't.
For now, I'll turn off the section analysis.
Activate the text command and select the top face of the Thread component.
I like to type out the clearance added to the default. For this one, I'll type out -0.1 and I'll extrude cut this down -.2mm to make a simple emboss.
I'll also do the same to the nut, to ensure that I can always tell which nut goes with the thread.
Again, I'll extrude cut the text down -0.2mm.
Let's create one more copy of the thread and nut, so we can do one more test print.
I'm going to copy the latest thread and nut and I'll make sure to select paste new from the top-level component.
After dragging them over to the right I'm going to turn the section analysis back on. I'll also make sure the thread component is active.
If you look at the threads on most plastic parts, for example, the threads on a disposable water bottle, you'll notice they're almost always rounded over. As we all know, most metals are stronger than plastics, and they hold up better long term.
Generally, plastic threads don't do well when they're very thin, as they break down and get gummed up to the point they don't work…which becomes a serious issue with threads.
Therefore, one of the things you can do with your 3D printed threads is to add a fillet or nice round over to the edge of the threads. This will make the much more durable.
We're going to do that to this 3rd model so we can compare the printed results.
I'll hide the nut component so we can work with the edge of the threads. I'll then select the face of the edge, before hitting the keyboard shortcut letter "F," as in Foxtrot, for the fillet command.
I'll add a fillet of .05mm.
As you can see, that adds a nice round over to each edge. However, when you think about it, .05 is very small, and won't make too much of a difference…and if we increase the fillet anymore we're going to get an error because there isn't a large enough face for the fillet.
What we can do instead is offset the face of the edge first, which will allow us to apply a greater fillet radius.
I'll select the edge, and then I'm going to hit the keyboard shortcut letter "Q". This time, I'll type a distance of -.1.
Before reactivating the fillet command, I'll select the edge again. This time, I'll add a fillet radius of .15mm, which equals a total of .3mm, something that will make a significant difference in the print.
We also want to make sure to add the same radius to our internal thread of the nut. I'll turn the visibility of the nut component back on and I'll make sure it's active.
I'll select the corresponding inner edge, before once again applying a fillet of .15mm.
Last but not least, we also want to make sure to mark this 3rd version, so we can tell them apart.
Since this is a copied component, we can quickly go back to edit the text command that was used earlier.
I'm simply going to add the letter "F" to the end of -0.1, signifying this is the one with the fillet applied. I'll also reposition the text so it's center aligned.
At this point, we're ready to print them out to test them!
I've gone ahead and printed these out on my Monoprice 3D printer. Let's take a look at the results.
The first one, which used the default clearance that Fusion 360 applies, is a little bit too tight. It actually got stuck on there and I had to use a vice and wrench to get it off. This default often doesn't work on smaller thread sizes.
The second one, works pretty well, as the clearance worked almost perfectly with my printer's tolerance. However, I can tell already that if this were to be used frequently, then the threads would start to lose their clean sharp edge.
The third one resulted in the best overall print. With the added fillet to the threads, it worked just as well as the second test, but the threads appear to be significantly more durable, especially for long-term use.
Another tip when working with plastic threads is to use a tap and die set to fix your printed threads. For example, the default clearance in Fusion 360 will often work, if you use the tap and die to fine-tune the printed results. I'll put more info about this on my site.
In summary, you'll want to create clearance tests before printing out screws for your project. The size of the thread and the tolerances of your printer will help determine the clearance needed. To add additional clearances to threads you can use Fusion 360's offset faces feature.
Last but not least, I want to give a shoutout to those who supported the channel over the last week by joining my Patreon or by contributing to my Buy Me a Coffee page.
Special thanks to the new Patrons…
Frank, Creativity Annex, Scott Rogers, Mikey, Roger Tomlinson, and Giovanni.
And thanks again to those who bought me coffee….
Tibor, Anthony Ricci, and the anonymous contributions.
I hope you've enjoyed episode number 2 of practical prints! Be sure to subscribe if you're not already, click the thumbs up icon if you learned something in this video, and click on that playlist in the lower right-hand corner to view the rest of the series.
Source: https://productdesignonline.com/fusion-360-tutorials/3d-printed-threads-model-them-in-fusion-360/
0 Response to "Autodesk Fusion 360 Easy Way to Generate Threads for Lids"
Post a Comment